McDarnalds.io
Development Setup
Welcome to the Devlog! Here you can find the basics of player movement, camera setup, object interactions and more. Download the Developer Scripts and reference the instructions below to start creating!
// Camera Setup //
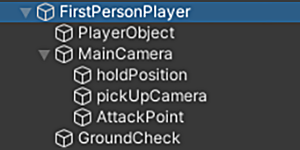
Out of the box, I implemented a basic first-person camera setup consisting of a Main gameplay camera and nested secondary camera that uses occlusion culling and empty game objects with reference points; one point for picking up items and reorienting them, one for the spawn point/angle of projectiles (shooting script), and the last, a parent for an unfiltered player POV. All mouse based movements follow the child nested scripts for the First Person Player as shown below.
For cross-platform VR/XR development, confirm that your script and player build input settings have the same values applied. Enable ‘Virtual Reality Support’ in Project Settings > Player and add your desired hardware support SDK via XR Plugin Management package. The basic axis based movements are applied as follows:
    void Update()
    {
        //move mouse left and right
        float mouseX = Input.GetAxis("Mouse X") * mouseSensitivity * Time.deltaTime;
        float mouseY = Input.GetAxis("Mouse Y") * mouseSensitivity * Time.deltaTime;

        xRotation -= mouseY;
        xRotation = Mathf.Clamp(xRotation, -90f, 90f);

        transform.localRotation = Quaternion.Euler(xRotation, 0f, 0f);

        playerBody.Rotate(Vector3.up * mouseX);
    }

    internal static float verticalSensitivity;
    internal static float lateralSensitivity;
}
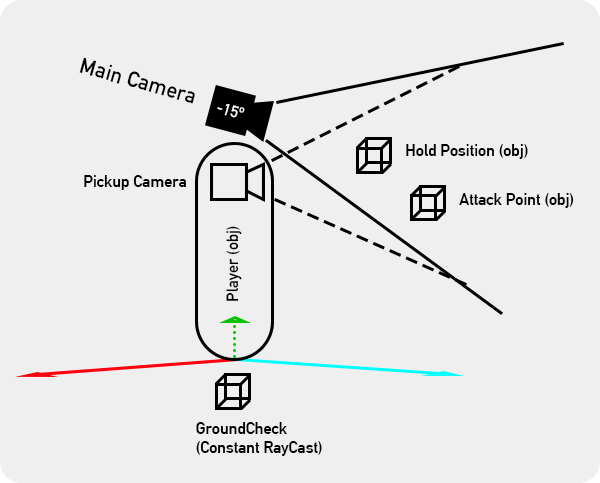
The diagram below details the duel camera setup for the default implemented settings. By default the movement script applied to the player object runs constant raycast groundchecks against the predefined layer ‘Ground’ overriding the need to make all ground objects a rigid body with mesh vertex collider.
// Player Setup //
Edit the variables of the included Character Controller to to fit your gameplay style. Out of the box it supplies movement speed, jump, sprint, and gravity. Note that by default, the same environmental gravity is applied to all gameplay objects in the sandbox. Make sure that the variables are the same in the script editor as they are in the Unity inspector settings.
public CharacterController controller;

    public float speed = 18f;
    public float gravity = -9.81f;
    public float jumpHeight = 3f;
    public float Sprinting = 10.0f;
    public float groundDistance = 0.4f;
    public Transform groundCheck;
    public LayerMask groundMask;
// Interacting with Objects //
I’ve implemented a basic pickup, hold, rotate, and drop based of the duel-camera setup. By default, objects with the ‘Pickup’ tag and are within a specified range can be appended to the ‘HoldPosition’ object placement shown with the secondary pickup camera occlusion culling masking everything but the held object. This references The MouseLook script and defines public variables as follows:
public GameObject player;
    public Transform holdPos;
    public AudioSource throwObject;
    public float throwForce = 50f; //throw force
    public float pickUpRange = 20f; //pickup distance
    private float rotationSensitivity = 10f; //rotation speed
    private GameObject heldObj; //pickup tag
    private Rigidbody heldObjRb; //rigidbody pickup tag
    private bool canDrop = true; //drow while rotating
    private int LayerNumber; //layer index

    public MouseLook mouseLook;
By default, when objects are picked up their rigid bodies maintain a Kinematic state so it clips through colliders of other rigid bodies while in the hold state. Change the Kinematic setting to ‘False’ to allow the external colliders of other rigid bodies.
For VR development, consider enabling continuous collision detection instead of discrete collision detection so other rigid body colliders don’t pass through solid objects based on frame rate. Alternatively you could implement a more precise system outside of using raycasting if you experience problems in hit colliders or bounce dynamics.
if (pickUpObj.GetComponent<Rigidbody>())
        {
            heldObj = pickUpObj;
            heldObjRb = pickUpObj.GetComponent<Rigidbody>();
            heldObjRb.isKinematic = true;
            heldObjRb.transform.parent = holdPos.transform;
            heldObj.layer = LayerNumber;
            Physics.IgnoreCollision(heldObj.GetComponent<Collider>(), player.GetComponent<Collider>(), true);
        }
Rotation movement is handled by the MouseLook script combined with Kinematic secondary camera view:
void RotateObject()
    {
        if (Input.GetKey(KeyCode.#addkey))
        {
            canDrop = false;

            MouseLook.verticalSensitivity = 0f;
            MouseLook.lateralSensitivity = 0f;

            float XaxisRotation = Input.GetAxis("Mouse X") * rotationSensitivity;
            float YaxisRotation = Input.GetAxis("Mouse Y") * rotationSensitivity;

            heldObj.transform.Rotate(Vector3.down, XaxisRotation);
            heldObj.transform.Rotate(Vector3.right, YaxisRotation);
// Shooting //
Set your public shooting variables in reference to the camera setup to fit your gameplay style. The script references the attackPoint and is applied to the Main Camera:
public class Shooting : MonoBehaviour
{
    public Transform cam;
    public Transform attackPoint;
    public GameObject objectToThrow;
    public int totalThrows;
    public float throwCooldown;
    public float throwForce;
    public float throwUpwardForce;

    public KeyCode throwKey = KeyCode.#addkey;

    bool readyToThrow;
The default code defines the inputs for shooting projectiles using forceDirection and RaycaseHit states before resetting the throw. It includes attack/upward force, cooldown duration, total throws, and specific object(s) to interact with:
private void Throw()
    {
        readyToThrow = false;

        GameObject projectile = Instantiate(objectToThrow, attackPoint.position, cam.rotation);

        Rigidbody projectileRb = projectile.GetComponent<Rigidbody>();

        Vector3 forceDirection = cam.transform.forward;

        RaycastHit hit;

        if (Physics.Raycast(cam.position, cam.forward, out hit, 1000f))
        {
            forceDirection = (hit.point - attackPoint.position).normalized;
        }

        Vector3 forceToAdd = forceDirection * throwForce + transform.up * throwUpwardForce;

        projectileRb.AddForce(forceToAdd, ForceMode.Impulse);

        totalThrows--;

        Invoke(nameof(ResetThrow), throwCooldown);
    }


private void ResetThrow()
    {
        readyToThrow = true;
    }
}
// VR Support in Unity //
This sandbox was created for use in desktop development and VR adaptive integration. Enable Virtual Reality support in Project Settings > Player and add your desired hardware support SDK via XR Plugin Management package. More on VR development in Unity at https://docs.unity3d.com/Manual/VROverview.html
Please reach out for any questions, comments or feedback at https://www.maxkeeley.com.
Thanks for viewing my games!